


Choosing Federation verandah tiles is easier when you compare complete floors. The main pattern, border and surrounding brickwork all affect the result. A small tile sample answers a different question from a photograph of a finished verandah.
Here are four projects from the Federation Tiles Factory gallery: a pale Octagon & Dot floor, two different Nottingham combinations and a detailed Paddington Continuous floor beside stone. Use them to narrow your choices before requesting samples or a quote.
1. Pale Octagon & Dot beside dark brickwork

This verandah pairs grey octagons with small white dots. The pale field sits beside dark brickwork and white painted posts, while a darker geometric border defines the edges.
Notice the difference between the quiet centre and the more detailed perimeter. If you like this balance, compare the Octagon & Dot pattern and Norwood border together, including their colours.
What to check at your home: photograph any posts or corners that interrupt the floor. The border needs to turn around those details, and that changes the space available for the main repeat.
2. Warm Nottingham colours beside a brick wall

Terracotta, cream and dark pieces create a stronger colour contrast in this floor. Small blue accents add another detail, and the border carries the palette around the outside.
Compare this with the first project: both use a Norwood 120mm border, but the field pattern and colour balance create a different effect. A border name alone does not describe the whole floor.
What to check at your home: place samples beside the brickwork and door in daylight and shade. Compare the Nottingham pattern as a complete colour combination, rather than choosing each colour in isolation.
3. Paddington Continuous beside stone

This floor combines a detailed geometric repeat with decorative feature tiles. The darker floor contrasts with the pale stone around it, and the border gives the main pattern a separate frame.
The project pairs Paddington Continuous with the Newcastle border. The feature tiles are part of the overall composition; their position matters as well as their individual design.
What to check at your home: mark the doorways, posts and any areas that will be covered by furniture. Review where the decorative features sit within the full layout. Browse our encaustic feature tiles if you want to explore that detail.
4. Drummoyne: Nottingham with a Windsor border
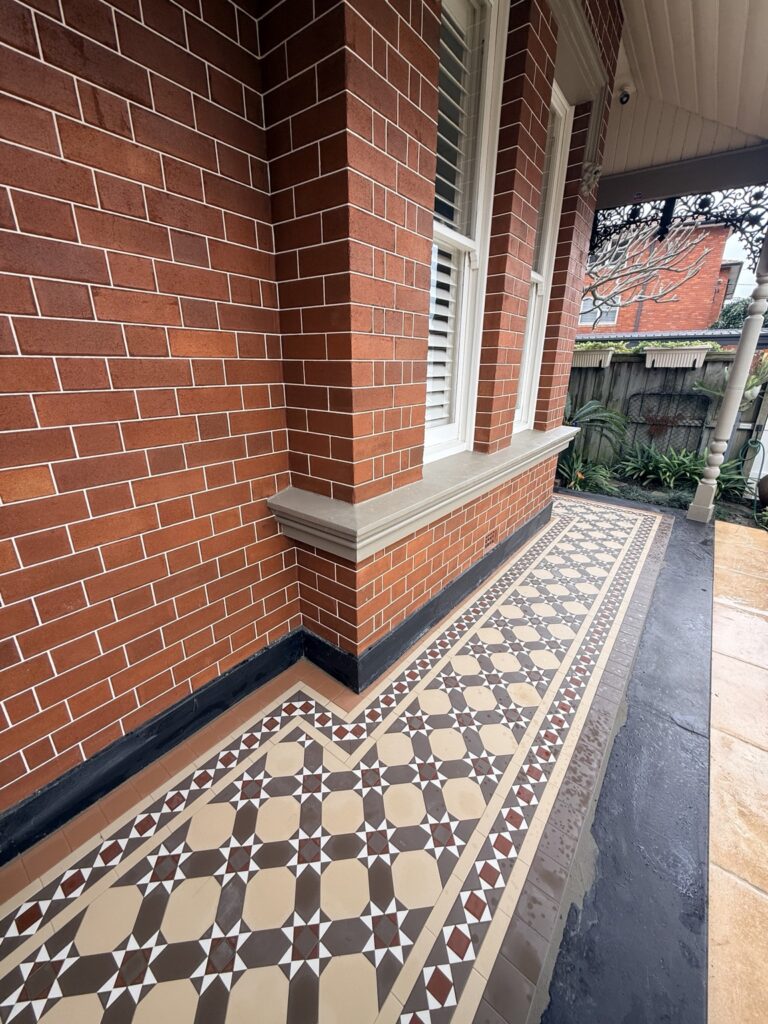
The oatmeal shapes create a light centre, with charcoal, red and white details carrying through the pattern and border. The close-up shows how the border follows the verandah edge and turns around the projecting brickwork.
Compare this with the warm Nottingham floor above. Both use the Nottingham pattern, but this project pairs it with a Windsor border and a different colour combination. A pattern name is only the starting point: compare the complete floor before choosing.
What to check at your home: show any projecting walls, columns and narrow sections in your photographs and sketch. Discuss how the border will turn at those points, then compare physical colour samples beside your brickwork.
How border width changes the usable pattern area
Measure the complete verandah first, then consider the space left inside the borders. The narrowest section may determine how well a pattern fits.
A simple planning example: a 1,800mm-wide floor with a 120mm border on each side leaves 1,560mm between those borders. With a 150mm border on each side, it leaves 1,500mm. This only illustrates the change in space; the final set-out must also account for joints, cuts and any extra bands.
Ask to see the repeat across that remaining width. Do the features line up comfortably at the doorway? Where are the cut pieces? Our guide to field patterns, borders and corners explains how to discuss these details.
Choosing tiles for an outdoor verandah
Tell us whether the verandah is sheltered or exposed to rain, and show any steps or changes in level. Confirm the specific tile finish and its suitability for your location before ordering. A photograph or a heritage-style pattern does not establish slip performance.
If an existing floor needs repair, send close-ups as well as an overall view. Our tessellated floor restoration guide explains the information needed to compare retaining, repairing and replacing tiles.
What to send for a verandah quote
- Your suburb or delivery postcode, and whether you need supply only or installation.
- The approximate length and widths, with a sketch showing corners, posts, doors and steps.
- An overall photograph and close-ups of the floor, edges and any damage.
- The project or pattern you like, plus any colours or border widths you are considering.
You do not need every selection finalised. Mention one of these projects and tell us what you like about it. Our cost and measuring guide explains the details that affect a quote.
Federation Tiles Factory manufactures tessellated tiles in-house, provides installation across Sydney and Newcastle and offers tile supply Australia-wide. Request a verandah tile quote.